Moen shower faucet provides no cold water, only hot

hot-girl-cold-broken-shower

A common issue with older Moen shower faucets is only cold, or only hot water coming out of the faucet or shower head.  This often happens with showers that are not used very often, or where the water supply is particularly hard or has high levels of contaminants.  If you search the web for help, the most often suggest is to replace the main cartridge (part number Moen 1225 or 1200).  However, this is most likely not the source of the issue.

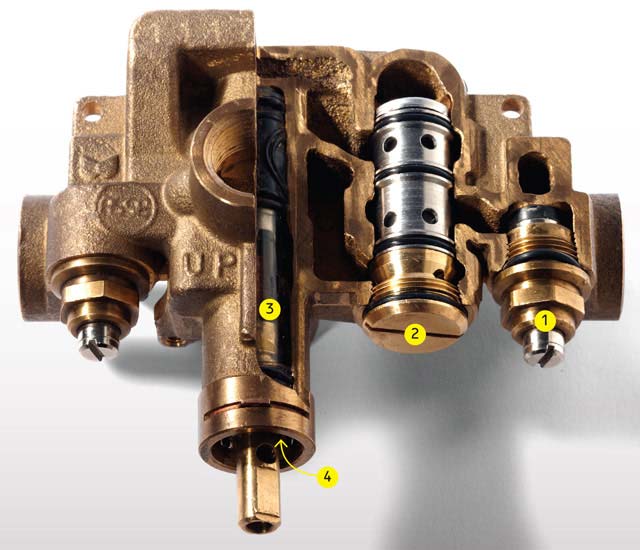
If you remove the shower faucet knob, and remove the cover behind it, you should see something like the image below.  This is a Moentrol 3570 valve, there are other similar model numbers.

moenvalve

Within the valve is what is called a balancing spool.  This balancing spool valve contains a piston which moves back and forth maintaining a given temperature even if the pressure on the cold side is reduced, for example someone flushes a toilet when the shower is in use.  It prevents a sudden blast of hot water which can lead to burns.  When you suddenly experience only the cold or hot water flowing regardless of where you set the flow handle, this valve is almost always the culprit.

The piston which is inside the balancing spool will get stuck in one position or the other.  When this happens, it essentially shuts off flow to either the hot or cold side.  Poor water quality and age will eventually cause the piston to get stuck in its bore.   The balancing spool (part number Moen 1423) can be seen clearly in the photo below.

moentrol valve

The first step in repairing the balancing spool valve is to remove it.  You will need to use a VERY large screw driver to unscrew the valve (number 2 above).  Make sure you shut off your water first!  You can also use a straight-edge piece of metal clamped in vice grips if you do not have a large enough screw driver.  Spray the outside of the screw with Liquid Wrench or other penetrating oil in advance of your attempt, it can be difficult to loosen.  If you are lucky, the valve will come out with the screw.  But, most likely the top of the spool will separate, like in the photo below.

IMG_5753

If this happens, you will need to retrieve the stuck piece.  The way that I accomplished this was to soak it in Liquid Wrench for an hour before my attempt.  I inserted a screw driver down into the piston and tried to lever it out, tapping with a hammer at the same time.  I then bent a piece of metal rod into a hook shape and fished it inside and caught it against one of the holes in the body of the spool.  Using a pair of vice grips I pulled until it came loose.  This may take some work, so be patient.

Once removed you have two options, replace with a new one, which is not cheap, retail price is between $55-95.00.  Or, you can usually successfully clean the spool.  To do this, remove the round piece of metal at the back of the valve (seen above).  Just slip a small screw driver into the gap and twist it out.  Then tap the piston out of the bore.  I used a socket to support the back of the spool, and used a hammer and screw driver to tap it out.

Next, you want to use fine sandpaper to clean off the piston journals, and the inside of the bore of the valve.  Get aggressive, you want the bore and journals to be polished clean.  Work the piston back and forth in the bore until there is absolutely no sticking or binding.  Then apply plumbers grease and reassemble.  Turn the water back on and test the faucet, you should now have hot and cold water, and just saved yourself a couple hundred dollar repair bill.


2005 Laser Blue Lotus Elise for Sale

After thirteen years of ownership, I have decided to sell my Lotus Elise.  This is a one-owner vehicle with 50K mostly highway miles.  It is an adult owned clean title car which is almost completely stock, never tracked, and has always been garaged.  I am the only person who has ever driven the car, it has never suffered any abuse.

I originally bought the car in June 2005, and put 40K miles commuting to work on nice days in the first three years I owned it.  Since then, it has mostly been used as a weekend toy, only being driven during nice weather.  It comes with original hardtop and soft-top, the hardtop has always been stored in the original bag, and has only been fitted a few times.  

The interior and exterior show minor wear and tear to be expected, but the car has never been in an accident or repaired,  The seat bolster and door card show minor wear, and one wheel has minor rash.  I replaced the center tunnel with a carbon-fiber clone from Sector 111, HID upgrade, and replaced the stock radio.  Both original parts will be included with sale.  

Touring package  – no Sport package.  

VIN SCCPC11175HL33564

Listed for sale at : $35,000 – serious buyers only – must be able to document funds before showing

Email: lotus (at) pcorner.com

Recent compression test last Fall, 240PSI all fours cylinders.

Cams inspected every 10K miles, they are in perfect shape.  Lifter bolt replaced last Fall.  Always have run Rotella T6 synthetic oil.


2011 MacBook Pro GPU Failure – A software fix to disable GPU

Last year I repurposed a 2011 Macbook Pro 15″ as my home media server.  This laptop had been my main machine for a couple years until I upgraded in 2015.  Early in its life, I had used gfxCardStatus to disable the discrete AMD graphics card.  I mainly did this because I did not need the performance, and it definitely affected battery life negatively.  Because of this, I never was aware of the issue that thousands of other MacBook Pro owners experienced, a failing GPU causes the machine to either not work at all, have odd display effects, or reboot when video modes are switched.

About a year after using this machine as my main media server, it started to randomly reboot.  I could not find anything that was causing it, it would just be running fine, and then reboot.  I did notice that if I started up the machine, but did not login to a user account, it would stay running for quite awhile.  After some online research, I soon found out about all the issues that have plagued this machine.  The AMD GPU seemed to be the most likely culprit.  After finally having the machine stay running long enough for me to reinstall gfxCardStatus, I determined that I could immediately crash the system just by switching graphics modes.  Success, I was finally able to confirm that the GPU was failing.

Because I do not have any application that requires the GPU, I realized if I could somehow disable it, I could be back in business.  After extensive searching, I found lots of partial solutions, many required booting with Linux, putting the logic board in an oven, or trying to cut power traces on the motherboard.  After lots of reading, I finally was able to come up with a solution that worked, one that did not require opening up the laptop, or installing Linux.

My machine is a basic system running High Sierra, version 10.13.  I have confirmed that this works, although I did not try with previous versions.  If you have a highly modified system with lots of custom kexts, it may not work.   This modification will force the laptop to not boot into discrete graphics (dGPU) but directly into integrated graphics (iGPU).  While you will now be able to use your system you will lose the ability to use an external display.  Thunderbolt data and video connections should continue to work as normal.   It also assumes that all kexts are still in their default location /System/Library/Extensions, all AMD-kexts remain except one which is required to be moved.

Let’s get started!

Power on your laptop while holding <Cmd>+<r>+<s>, this will get you into Recovery/Single-User mode.  If your machine will not boot up into this mode, you can try putting it into a freezer for 10-15 min beforehand.  If you can keep the machine cool, it should let you boot to a command prompt.

The first step is to disable SIP.  This is done by entering : csrutil disable 

This is a critical step, as the following commands will not run unless you disable the default SIP protection.  You can leave this off permanently, or re-enable after you complete the whole process.  At this point, reboot the laptop by entering : reboot

This time hold down <Cmd>+<s> to boot into single-user mode.  We will then issue commands to disable the AMD GPU on boot by writing specific values into the NVRAM.  

Enter : nvram fa4ce28d-b62f-4c99-9cc3-6815686e30f9:gpu-power-prefs=%01%00%00%00

Enter : nvram boot-args=”-v”

This will turn on verbose mode when booting up.

One again : reboot

Hold down  <Cmd>+<s>  on boot

Next we will want to move one AMD kext so that it is not loaded on initial boot.  We will just move it, because after the machine boots up and you login, we will want to reload it.  This will keep the GPU disabled, but also will remove power from it so that it keeps your system cooler.

Type the following :

mount root partition writeable
/sbin/mount -uw / 
mkdir -p /System/Library/Extensions-bkup 
mv /System/Library/Extensions/AMDRadeonX3000.kext /System/Library/Extensions-bkup/ 
touch /System/Library/Extensions/ 
mkdir -p /Library/LoginHook
nano /Library/LoginHook/LoadAMD.sh

In nano, add the following text and hit control-X to save

#!/bin/bash
kextload /System/Library/Extensions-off/AMDRadeonX3000.kext
exit 0

You should have a saved file called LoadAMD.sh at this point.  Now type : 

chmod a+x /Library/LoginHook/LoadAMD.sh
defaults write com.apple.loginwindow LoginHook /Library/LoginHook/LoadAMD.sh 
reboot

This time, let the machine boot up normally

Reboot normally and your machine should work normally, however you will have an accelerated iGPU display.  This process will most likely need to be repeated when you do any system upgrade.  The NVRAM setting should stay, however you most likely will need to move the AMDRadeonX3000.kext file again.  Just make sure that if a new version is used, you save each.  

Hopefully this will allow your machine is provide several more years of service.  Leave me a message if you have any questions, and/or you will successful.

To return your system back (if you need to do this for some reason), execute the following.

Power on your laptop while holding <Cmd>+<r>+<s>, this will get you into Recovery/Single-User mode.

Re Enable SIP by doing : csrutil enable 
Shut down your machine.
Press the power button and then press command-option-p-r to reset the Mac PRAM 
Hold those keys down until your Mac reboots again and you hear the startup chime.
Let go of the keys and let your Mac reboot normally.

Your Mac should now be back to stock.


Unable to renew using LetsEncrypt Certbot-Auto with CRON – Fail

Recently I had a fail when trying to automate the renewal of my LetsEncrypt SSL certificates using a CRON job, I experienced the following error when running “certbot-auto renew” :

Error: couldn’t get currently installed version for //.local/share/letsencrypt/bin/letsencrypt:
//.local/share/letsencrypt/lib64/python2.6/site-packages/cryptography/__init__.py:26: DeprecationWarning: Python 2.6 is no longer supported by the Python core team, please upgrade your Python. A future version of cryptography will drop support for Python 2.6
  DeprecationWarning
An unexpected error occurred:
ContextualVersionConflict: (setuptools 0.9.8 (/.local/share/letsencrypt/lib/python2.6/site-packages), Requirement.parse(‘setuptools>=1.0′), set([‘certbot’]))

At first glance, this failure would appear to have something to do with Python 2.6 and the cryptography site-package.  However, this actually just turns out to be a warning.  The unexpected error below is what causes the issue.  If you look closely at the error (couldn’t get currently installed version for //.local/share/letsencrypt/bin/letsencrypt) line and the line starting with ContextualVersionConflict, you will see that it is trying to access (/.local/share/letsencrypt/lib/python2.6/site-packages).  In both cases, the issue is with //.local/, when running as a cronjob, this needs to point to /root/.local.  There are a couple ways to fix this.

One, you can edit your crontab and edit HOME=/ to HOME=/root/
Two, you can create a wrapper script that changes your HOME directory before calling certbot-auto renew
Lastly, you can choose to do what I did and directly edit the certbot-auto script.   I hard-coded the values for HOME and XDG_DATA_HOME.  This has the disadvantage of getting wiped out if you ever update that script, however it also guarantees that no matter how that script is executed, it will always be pointing to the correct location.

To edit the script, add the following lines :
HOME=/root/
XDG_DATA_HOME=/root/.local/share

before the line that has :
VENV_NAME=”letsencrypt”

Leave a comment if this solved your problem, or if you are experiencing any other strange issues running certbot-auto from a cron job.


Installing LetsEncrypt Certbot on Amazon Linux Server

The LetsEncrypt Certbot is an awesome tool for getting and maintaining SSL certificates for your sites.  In most cases, it is extremely easy to setup and maintain.  However, installing it on Amazon’s proprietary Linux server in EC2, it often fails.  These are the steps I took to get it to install properly in my environment.  

wget https://dl.eff.org/certbot-auto
chmod a+x ./certbot-auto
sudo yum install libffi-devel
sudo yum install openssl-devel
sudo chown -R ec2-user:ec2-user .well-known/
./certbot-auto –no-self-upgrade –no-bootstrap

After performing these commands, you should now be able to use Certbot as you would normally.

Certbot will place your completed SSL certs in the following paths.

  • Certificate: /etc/letsencrypt/live/YOUR_WEBSITE_HERE/cert.pem
  • Full Chain: /etc/letsencrypt/live/YOUR_WEBSITE_HERE/fullchain.pem
  • Private Key: /etc/letsencrypt/live/YOUR_WEBSITE_HERE/privkey.pem

To setup auto renew, you will need to add the following line to your crontab file.  Make sure you are running as root when you do so using sudo su.

Adding this  line will run the renewal process twice per day.

0 2,14 * * * /home/ec2-user/certbot-auto renew

 If you have any issues, leave a message in the comments so we can help.


Upgrade your Miata’s headlights with Hella H4 halogen bulbs, Cibie eCode projectors, and a relay kit.


My 1994 Mazda Miata has suffered over the years with a very poor headlight setup.  It got to the point where I just did not enjoy driving it at night anymore.  The pathetic yellow light dripped from the front of the car, providing limited visibility, even in urban driving.  Rural driving, out where I live, was just down right scary.

So, I finally decided to do something about it.  I ultimately decided to upgrade my sealed beams for a set of Cibie eCode projectors fitted with H4 100/80W bulbs.  When upping the watts and amperage from stock values to these floodlights, it is important to add an aftermarket lighting relay.  Your factory wiring harness and light switch will thank you, 20 year old thin wire usually does not like having 10+A flowing through it on a regular basis.  

First step, buy a quality relay harness that will work with your Miata.  The picture below shows the unit I went with.  Installation took all of about an hour.  I suggest connecting the power to the main fuse panel via the main breaker bolt.  Also, wire it in with your stock lights first to test operation before upgrading to the H4’s.  Changing one thing at a time helps with troubleshooting if you run into any issues.

The next step is to replace your sealed beams with the Cibie eCodes.  These are European styled projectors that will amaze you with how much better they project light down the road.  The light is focused, yet is aimed so as not to dazzle oncoming traffic.  Swapping out the projectors just involve popping your headlights, removing the plastic shroud around the pop-up, and then loosen the three screws around the silver retaining benzel.  


Lastly, we get to the Hella H4 100/80W bulbs.  Most folks will stick with the more standard 60/55W bulbs, however I highly recommend upgrading to a higher wattage.  The difference in output is just stunning, and when combined with the Cibie eCodes, you will not blind other drivers.  There are other wattage H4’s such as a 130/90, 130/100, and 100/90.  As long as you have upgraded your wiring with a relay harness, it is safe to give these bulbs a try.  However, it has been reported that the high wattage bulbs have very short lifetimes, sometimes only hundreds of hours before they fail.  Also, care must be taken when installing an H4 to get NO fingerprints on the bulb.  The oil from your hands will cause early failure as well. 

If you shop around (click on pictures to see on Amazon), you can pick up all the parts you need for less than $150.  And, future replacement bulbs can be picked up for less than $10 each.  Don’t put it off, click on the pictures above, go to Amazon, and be amazed at how awesome a new headlight setup will enhance your night time driving!  Leave a message to let us know how it goes for you.  


Troubleshooting and Hacking the Ambient Weather WS-0900 Weather Station

For Christmas I received the Ambient Weather WS-0900-IP Wireless Internet Remote Monitoring Weather Station.  This little unit is a great way to setup your own personal weather station, which as a bonus allows you to access the data over the Internet.

So, after setting up the unit, and playing with it for a while, I got the urge to start hacking it.  I found out that you can access the device over telnet.  The built-in controller has a limited set of commands, and unfortunately on this model, does not really have much utility.  After playing around with various commands to try and redirect the units update from weather underground to my own servers, I accidently used the fwupdate command which wiped out the units ROM.

Lesson learned, don’t mess around with stuff unless you are ok breaking it!  After a bit, I was able to work out the following procedure for reloading a valid firmware.

This is the proper fix if your  IP Observer is not connecting.  In this case, only the Power, Link and ACT lights are lit blue on the unit, and the ObserverIP module does not communicate to the server, and you cannot access the unit via the built-in web server.   This state will require that the firmware be reloaded.

  • Download the latest firmware here:  http://www.AmbientWeather.com/observerip.html 
  • Turn off the power to  the ObserverIP module however leave it connected to your network. 
  • Launch the IP Tools.   Because the ObserverIP module is turned off, you will not be able to locate it on your network, but continue anyway. 
  • Select the Upgrade button in IP Tools. 
  • Select the Select File button, and browse to the location of the file you downloaded in Step 1. 
  • Select the Upgrade Firmware button. 
  • Plug in the ObserverIP module. The software will locate the device on your network and begin the update.  The dialog box will display Received a Read Request from the ObserverIP module. A green progress bar will provide you with the upgrade status. 
  • Once the firmware upgrade is complete, the dialog box will display Read session is completed successfully.
  • Wait about one minute for the ObserverIP module to reboot, and then access the web server.

You should have a restored fully functioning unit!  I still have not been able to redirect the weather updates to another server.  In my unit, a WS-0900 with the 3.0.8 version it appear that the server that it connects to is a hard coded IP address.  Leave a message here if you have found a way to make this work.